
The most recent week of Destiny 2’s Season of the Want brings a brand new Exotic weapon into the sport for gamers to chase: Wish-Keeper, a brand new Exotic bow. This one is much like previous seasonal Exotics, like Vexcalibur and Retrofit Zero, in that you’re going to earn the alternatives to craft totally different variations over time as you replay its Exotic mission, Starcrossed.
This is all the pieces you could know to start out Starcrossed, full the mission, earn Wish-Keeper and use it successfully.
How to Begin the Starcrossed mission and Wish-Keeper Exotic bow quest
You will not discover the mission as quickly as you boot up Destiny 2 this week. With a purpose to unlock the Starcrossed mission, you will have to advance the seasonal story, the Wishing All The Finest quest line, so in the event you’ve been neglecting your duties in The Coil and Riven’s Lair, you will have to compensate for previous weeks first.

Subsequent, full this week’s seasonal mission, Apophasis. That’ll take you thru the story of the Vex of the Sol Divisive making a play for Ahamkara eggs in Riven’s Lair. As soon as you have crushed that mission, return to the HELM and speak to Crow, who will let you know that the Vex have absconded to the Black Backyard with one among Riven’s eggs. That’ll unlock the Exotic mission on the Director, which you’ll be able to entry from the HELM.
Starcrossed Exotic Mission Guide

The Starcrossed mission, like a variety of current Exotic missions, is an expansive run by way of an space with its personal devoted mechanics. On this case, you are working by way of the Black Backyard, and need to make your manner by way of particular obstacles by sure enemies.
The obstacles appear like a blue mist and require the Sire’s Obligation buff to open. You may acquire the buff by entering into blue wells discovered within the enviornment close to the barrier. With out utilizing the Sire’s Obligation buff and killing the corresponding Stubborn Phalanx, a Taken Phalanx enemy, you’ll be able to’t move by way of these obstacles. The Sire’s Obligation buff lasts about 45 seconds.

You may move into the orange mist, then again, however you will obtain a debuff referred to as Unwelcome that may slowly kill you, whereas sapping your skill to dash. Search for orange wells to realize the Dam’s Reward buff, which is able to shield you from the orange mist for about 45 seconds.
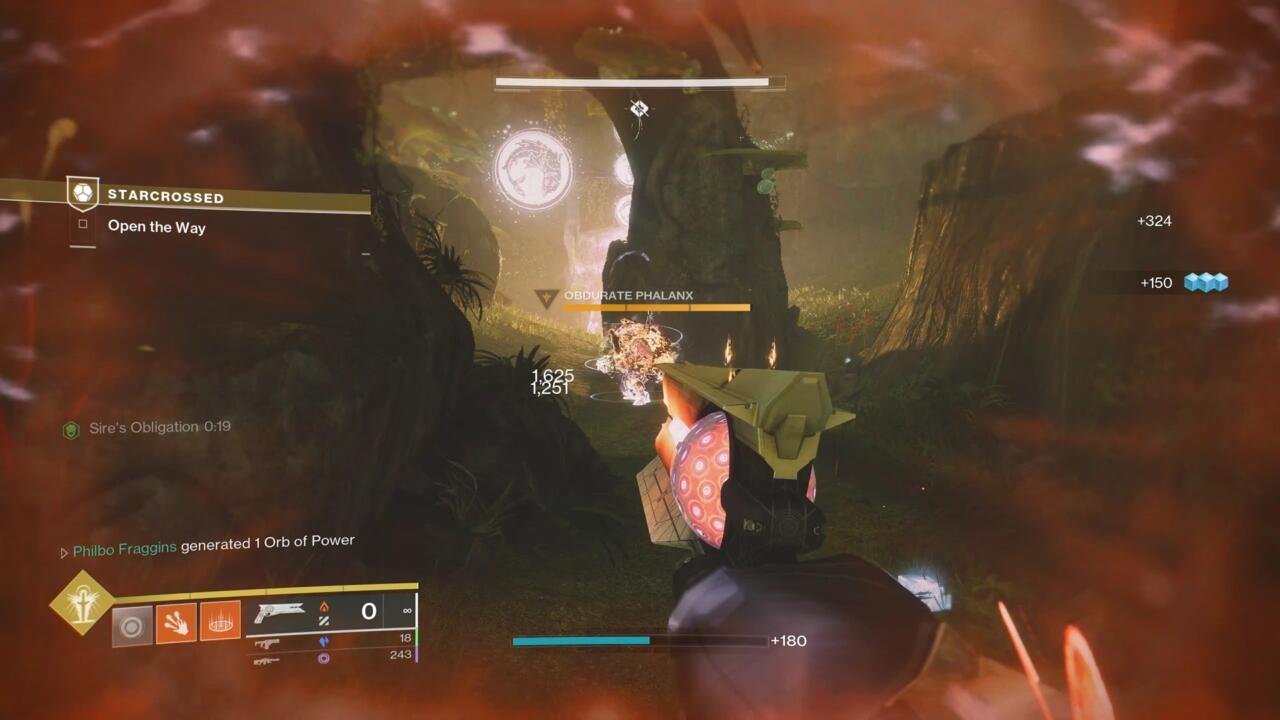
Once you begin the mission, advance by way of the Black Backyard till you hit your first Stubborn Phalanx, which is able to train you the primary mechanic for the remainder of the mission. You may see an icon above the barrier, which you need to acknowledge from the Final Want dungeon and the Wall of Needs. The identical icon seems over the Phalanx. You’ll want to kill the Stubborn Phalanx when you have the Sire’s Obligation buff with a view to dispel the fowl icon and open the barrier.
Stubborn Phalanxes – Open The Manner goal
After you move by way of the primary barrier, you will quickly come to what’s basically your first main encounter of the mission, the place you must kill three Stubborn Phalanxes to open one other barrier. Right here, the mission provides some complexity to the Sire’s Obligation mechanic, requiring you to each preserve the buff and kill the Stubborn Phalanxes in a particular order.
Earlier than you begin preventing, get near the barrier and have a look at the three icons that seem earlier than it. Our run had fowl, fish, and dragon icons, however these look like they may very well be randomized. These correspond to the three Taken Phalanxes scattered all through the room. Standing on the entrance to this enviornment and dealing with the barrier, you will have one Phalanx instantly to your proper near the doorway, one in the midst of the room beneath an overhanging rock, in entrance of the barrier, and one within the again-left nook of the room, behind some rocks.
Timing and velocity are necessary on this encounter and all through the mission, as a result of in the event you mess up the mechanics, the lock sealing the barrier will reset, forcing you to kill every Stubborn Phalanx greater than as soon as. To open the lock, you could kill the Stubborn Phalanxes within the order proven on the barrier as indicated by their icons, prime to backside. For those who kill a Phalanx out of order, the lock will reset and scramble the icons, so you will have to study the brand new order.
You may solely kill Stubborn Phalanxes with the Sire’s Obligation buff, however letting the buff run out additionally resets the lock and scrambles the icons. So when you choose up the Sire’s Obligation buff, you could keep watch over the timer within the nook of your display screen and frequently reset the buff earlier than it runs out. You do not have to kill Stubborn Phalanxes underneath any form of time restrict, although, so you’ll be able to assault, do some harm, after which withdraw to refresh your buff (which you will have to do in the event you play the mission solo).
Search for the Sire’s Obligation effectively to the left of the doorway to the world. Observe the place it’s and return to it steadily to maintain the lock from resetting. After you kill your first Phalanx, a brand new Sire’s Obligation effectively ought to open up on the rock archway within the middle of the room, providing you with one other place to refresh your buff. Nonetheless, bear in mind that killing every Phalanx spawns Vex Cyclopes across the room, and you may need to take them down so they do not snipe you once you’re not paying consideration. Smaller enemies may even frequently respawn, particularly snipers, so watch out about transferring round within the open.
As soon as you have killed all three Phalanxes, the lock will open and clear the barrier, permitting you to maneuver ahead.
Simply forward, you will discover the Dam’s Reward buff in a effectively. Forward, you will see the orange mist that provides you the Unwelcome debuff, however with Dam’s Reward you’ll be able to traverse it with out problem.
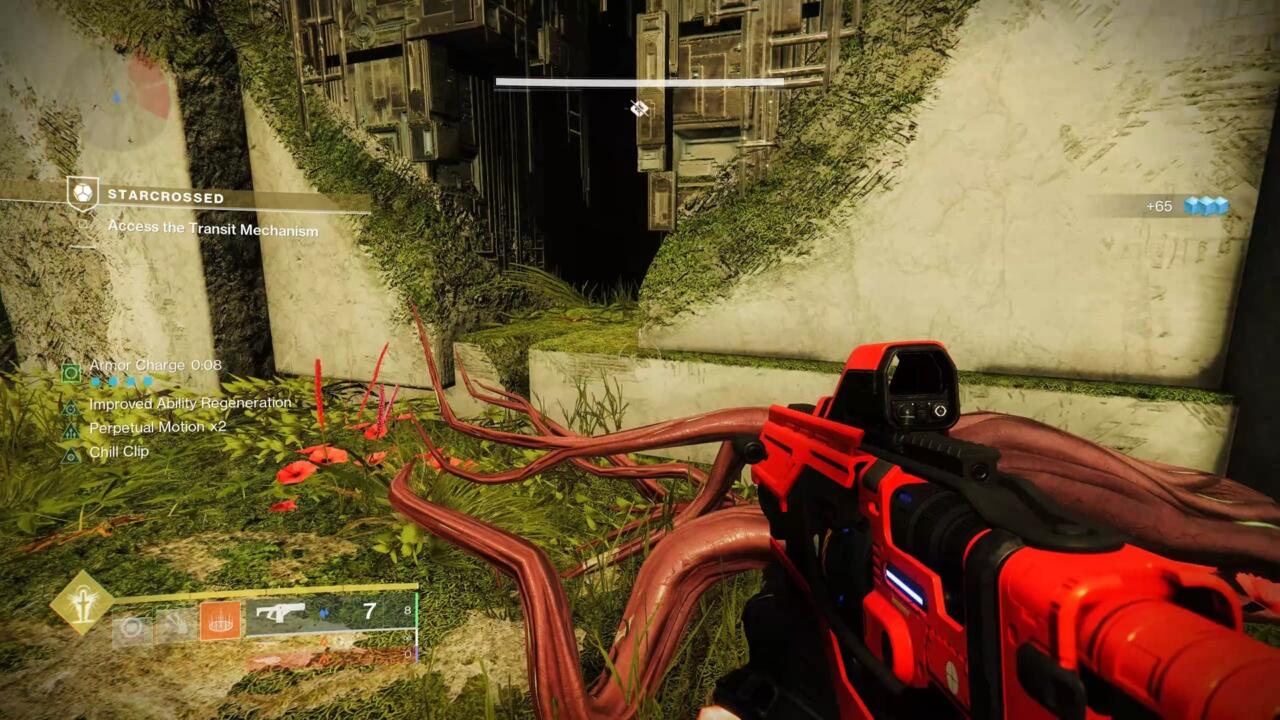
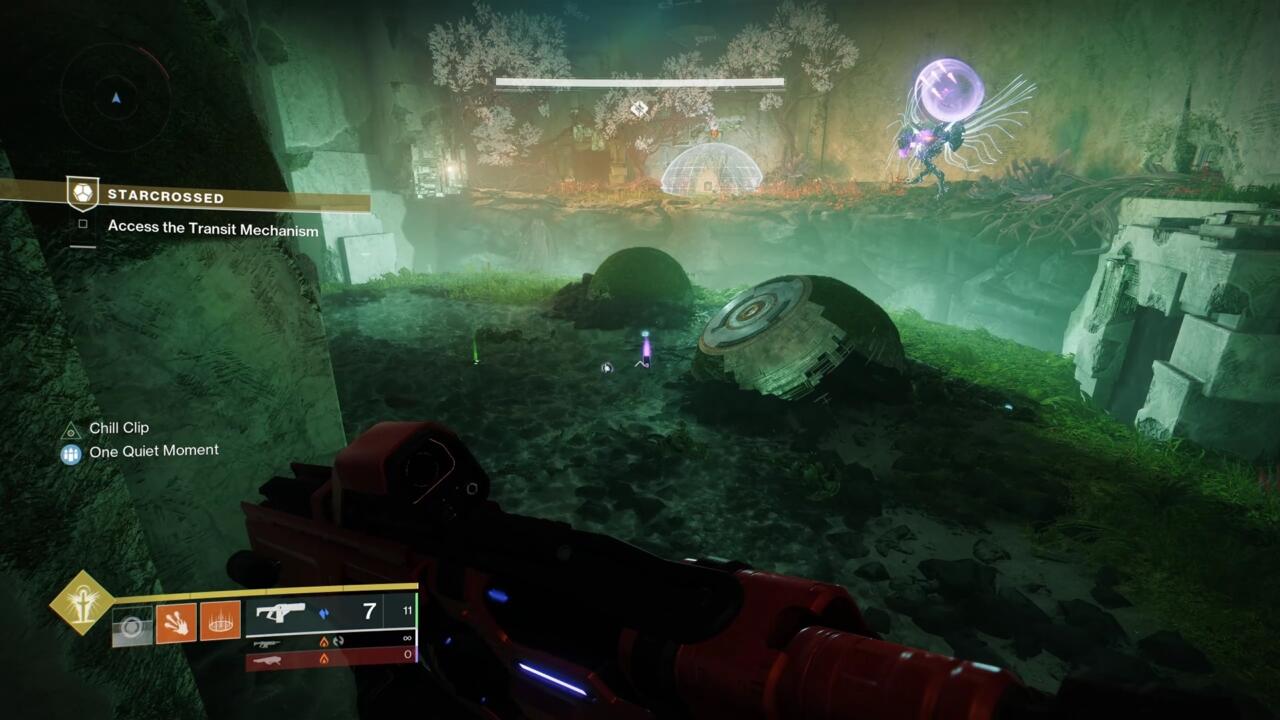
Gatekeeper Wyverns – Transit Mechanism goal

Just a bit additional, you will discover a Vex gate blocked by a barrier with three pink diamonds beside it. These point out three locking mechanisms you will want to search out all through the following space. It is a bit of a maze, so you will have to discover a bit.
Within the middle of the world up forward, you will discover an orange effectively when you kill the enemies there. To the proper is a subject of orange mist you’ll be able to traverse with the buff. Do not go that manner simply but, although.
As an alternative, look to the left wall proper earlier than the spherical dais that has the effectively and you will find a small gap you’ll be able to sneak by way of. That’ll put you above a room with the primary locking mechanism inside, blocked by a Vex barrier dome. There are additionally a bunch of enemies within the room, together with a Gatekeeper Wyvern. You’ll want to kill the Gatekeeper Wyvern to dispel the barrier and entry the locking mechanism. From this vantage, you are a bit more durable to kill than in the event you entered the room usually, which might require you to move by way of an Unwelcome subject.
Watch out with the Gatekeepr Wyverns–they’re robust to kill and can shred you shortly, making this a tough encounter in the event you’re solo. Weapons resembling Dragon’s Breath are nice all through this mission for dealing large harm to robust enemies; a couple of rockets can deal with the Wyverns fairly handily. You may additionally need to think about Strand or Stasis skills that may droop and freeze enemies for crowd management as effectively.
After killing the primary Wyvern, search for a tunnel close to the place you entered the room and comply with that ahead, killing the mess of enemies you discover. The following Wyvern is in a room that is filled with orange Unwelcome mist; you will discover a effectively on the base of some stairs simply forward. Comply with the steps up after which bounce as much as a ledge above for an additional helpful vantage to kill the Wyvern. For those who’re cautious about it, you’ll be able to keep out of the mist till you kill all the pieces on this room, then run again and get the Dam’s Reward buff to guard your self to hit the change. Simply watch out of respawning enemies each within the Wyvern room and behind you, together with Quantum Hobgoblin snipers.
After flipping the second change, go away the room by way of the mist barrier on the proper if the change is at your again. You may exit right into a hall with no ground, the place you will have to make your manner alongside the partitions. Be careful for traps right here, as bricks will transfer to push you off the ledge at sure locations. There are additionally enemies forward, together with snipers, so take care of them rigorously earlier than continuing.
On the finish of the hallway, you will discover one other orange effectively, however you needn’t fear about it from this facet. Leap throughout the hole to the platforms on the far facet and you will find a room with a spherical entranceway and a rotating door. This spot offers fairly good cowl to kill the enemies inside, providing you with a better time of taking down the third and ultimate Wyvern. Once you hit the third change, all of the Unwelcome mist will disappear. From the change, head out by way of the outlet on the proper facet of the room, beside the spherical entrance you got here in by way of, to return to the primary enviornment.
The Vex portal you first handed as you got here in is now unlocked, however is guarded by a number of robust foes. You may see an Elite enemy referred to as a Malignant Wyvern, and a large Gate Lord-like Minotaur referred to as Ixion, Covetous Thoughts. Each are robust, however particularly with Dragon’s Breath, you need to have the ability to dangle effectively again in cowl and hit them for main harm from distant, making this struggle fairly easy. Filter all of the enemies to open the gate and progress.
The gate will take you right into a minor leaping puzzle, the place you will have to make your manner throughout some giant gaps to small ledges. It is not particularly tough to cross, although. You may exit into an open space with some enemies. Make your manner alongside the trail to the proper and comply with it by way of the Vex construction. You may hit a big hole that you could’t cross, however you’ll be able to comply with the ledges to the proper alongside the cliff partitions till you attain a cave filled with Taken. Clear them out, after which a handful of Vex simply past them, to enter one other enviornment referred to as the Roost.
Roost – Deactivate the Barrier goal
This is the place the mission combines all the pieces you have beforehand needed to do into a brand new mechanic. Taken enemies will spawn on this room together with an Stubborn Phalanx with an icon, and you will find an orange effectively for the Dam’s Reward buff right here. You are working to open one other blue barrier, which is simply forward and down a brief flight of stairs. Simply in entrance of the barrier is the blue effectively for the Sire’s Obligation buff. As earlier than, the barrier has three icons, indicating that you must kill three Stubborn Phalanxes to open it, and to take action so as.
The opposite two Phalanxes are in caves that connect with this central location. One is to the left of the barrier and the opposite is to the proper of the orange effectively. Icons could be discovered on the opening of the caves to let you know which Phalanx is inside.
So to advance by way of this encounter, you want each the Dam’s Reward buff and the Sire’s Obligation buff. Once you choose up each, they mix into a brand new buff referred to as Topped by Dragons. The excellent news is that Topped by Dragons will shield you from orange Unwelcome mist and allow you to kill Stubborn Phalanxes. As earlier than, although, you could frequently reclaim the buff to maintain the timer from operating out. If the buff timer expires, the barrier lock will reset and you may want to start out over. Nonetheless, touching both the blue or the orange effectively will restore the Topped by Dragons timer. After you have each buffs, both effectively will refresh it, so that you now not have to fret about touching each.
The encounter is a bit tough simply due to the consistently respawning enemies, particularly solo, however there’s a number of cowl in all places so you’ll be able to usually maintain out of hurt’s manner as you do hit-and-run assaults on the Phalanxes between sprints to refresh your Topped by Dragons buff. For those who’re alone, take your time to maintain your self buffed and wholesome and take out the enemies by way of a number of rounds of assaults.
In any case three Phalanxes die, you’ll move by way of the barrier for a ultimate boss struggle.
Akardon, Pitiless Thoughts boss struggle

Simply by way of the barrier is a brief drop into a big, spherical enviornment. Inside is a giant Vex Hydra referred to as Akardon. You may discover proper earlier than you enter that the room is filled with orange Unwelcome mist and that Akardon is marked by the identical blue glow because the Stubborn Phalanxes. A blue effectively and an orange effectively are proper on the entrance to the boss struggle, permitting you to nab the Topped by Dragons buff instantly.
There are a variety of enemies in right here as effectively, but in addition a variety of cowl. You may normally hang around on the perimeters of the room and discover good safety from most assaults. You may additionally see wells to revive your Topped by Dragons buffs on the left and proper sides of the room, close to the place the boss begins, in the event you want a fast refresh.
First, you will need to destroy the 2 Taken Phalanxes on the perimeters of the room, referred to as Pitiless Attendants. They’re fairly spongey enemies, however they like to hang around towards the again of the room and can have a tough time hitting you in the event you use the steps and platforms close by for canopy. Kill the Pitiless Attendants and you may destroy Akardon’s rotating protect, making it a lot simpler to take care of the boss.

As soon as that is finished, it is a fairly simple struggle, with the be aware that you’re going to need to frequently filter out enemies to make your life a bit of simpler. Akardon will sometimes summon small Vex robots to hurry and detain you in spherical Vex shields, which might go away you very susceptible. Taken Goblins will spawn once in a while and may protect the boss, so you will have to take care of them as effectively. Lastly, Vex Harpies prefer to float across the air in the midst of the world to hammer you in the event you go away cowl.
Dragon’s Breath is fairly overpowered for this struggle, nevertheless, because it lets you deal big harm to the boss whereas staying very secure. Enemies do not actually enterprise to the perimeters of the room, so once I fought this solo, I caught behind the wall on the proper and took my time killing all the pieces, ending the boss with out a lot bother. The hardest half is venturing out of canopy to refresh the Topped by Dragons buff and to assemble ammo.
As soon as Akardon is lifeless, head by way of the spherical doorway it was guarding in the back of the room. You may discover a chest on the opposite facet together with the bones of an Ahamkara. The chest will award you Wish-Keeper, an Exotic Strand bow.
As with different, comparable Exotic missions, you’ll be able to unlock Catalysts for Wish-Keeper by replaying the mission on Legendary issue. It seems that, identical to these different Exotic missions, a brand new Catalyst will turn into obtainable every week going ahead, for a complete of 4. None of these Catalysts are presently obtainable as of this writing, so we’ll replace this information with extra info once they drop.
What does Wish-Keeper do?
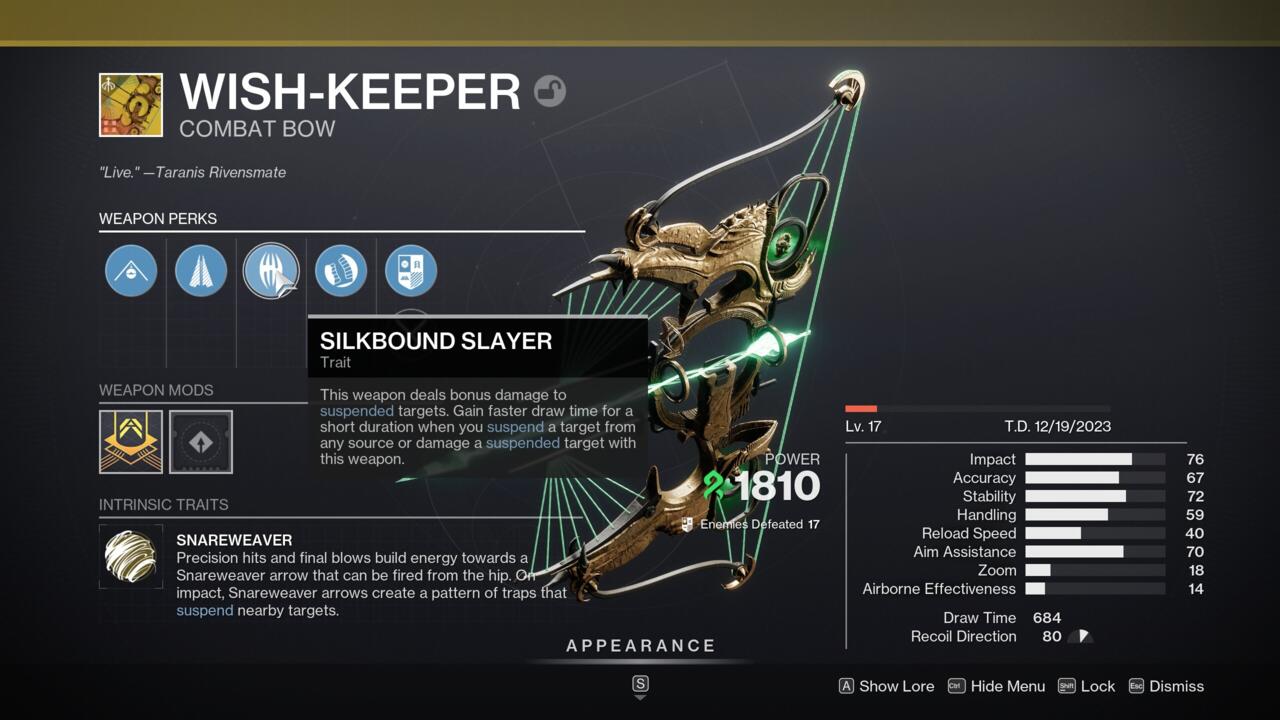
Wish-Keeper is a Strand bow you should use in your Major weapon slot, and it seems to be to have some severe potential synergy with Strand builds specializing in utilizing the droop debuff on enemies. The bow shoots usually once you purpose down the sights, however every time you land a precision hit or a ultimate blow with it, you will cost the bow up barely, as indicated on the facet of your display screen.
Once you hit six prices, Wish-Keeper can fireplace a particular Strand arrow when aiming from the hip, referred to as a Snareweaver arrow. That arrow will droop a goal you hit with it, whereas additionally making a grid of Strand vitality on the bottom close to the place it impacts. Any enemy that walks into the grid may even turn into suspended, permitting you to set a giant suspension lure in the midst of teams of enemies.
What’s extra, Wish-Keeper good points a quicker draw time once you droop enemies with any technique (that features each the bow and your Strand skills), or use it to wreck suspended enemies. So you will shoot quicker and do extra harm once you shoot suspended enemies, and you should use the bow so as to add Strand suspension to your different subclasses. With all of the Seasonal Artifact mods that deliver synergy between Photo voltaic and Strand results this season, Wish-Keeper ought to enable you some highly effective construct choices.
Wish-Keeper Exotic Catalysts
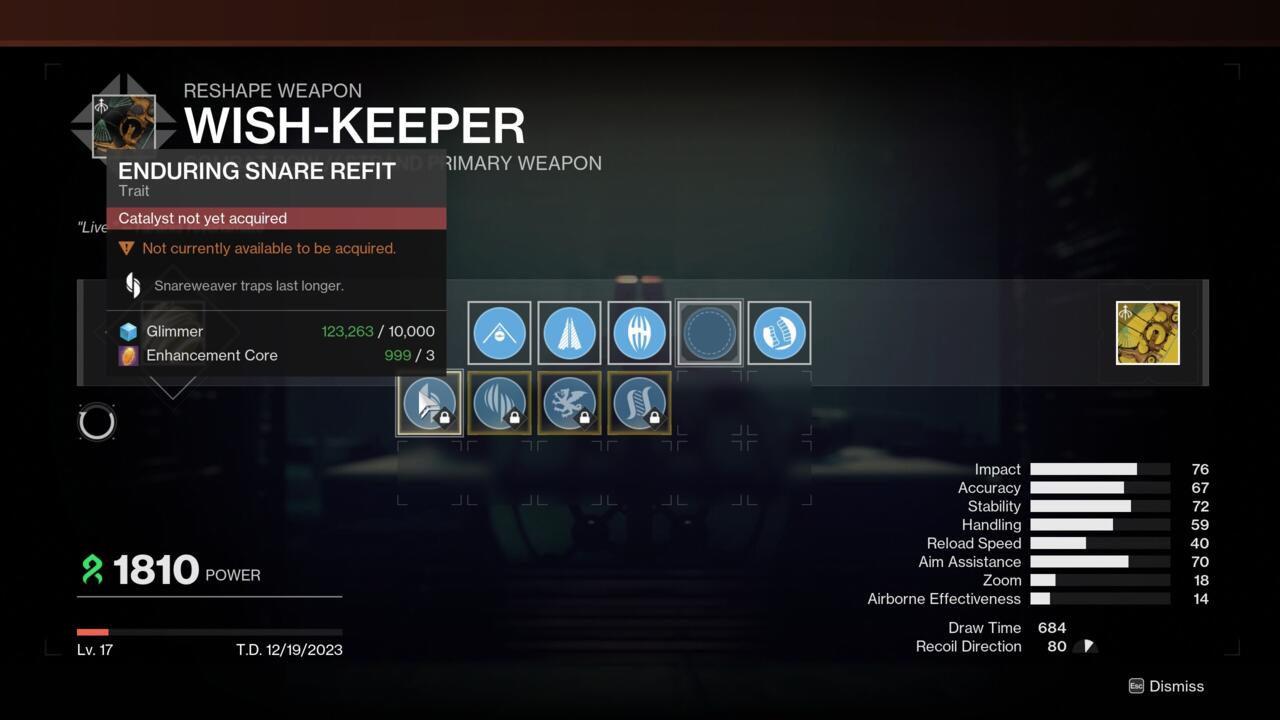
There are 4 Exotic Catalysts for Wish-Keeper. Totally upgrading it by way of its 4 Intrinsic enhancements provides 10 factors to its Stability, Dealing with, and Vary stats. You may also add Enduring Snare, which causes your Snareweaver lure to last more; Multithreaded Snare, which will increase the variety of enemies that may get caught in your Snareweaver lure; Vorpal Weapon for elevated harm in opposition to main enemies and Guardians; or Hatchling, which creates Threadlings once you get speedy kills or precision kills with the bow.
There’s extra to search out within the Starcrossed Exotic mission, and we’ll replace this information as we uncover all its secrets and techniques.